Showing posts with label Kim Schoenberger. Show all posts

Saturday, January 1, 2011

Kim Schoenberger - XYZ

It was like fast and furious to get all these letters finished today and posted! Seeing the third alphabet for ALaW 2011 starts this Monday. So, simple and sweet to wrap things up.

I chose to use my most favourite piece in this alphabet to finish the last two letters using that technique with clay inlay. It happens to be 'P' -dots created by the pointy end of a stick, well, a pencil really.

XYZ - Techniques...


X - Inlay - with red porcelain slip
Y - Freehand marking - with red porcelain slip inlay
Z - Carving
(The image is a tad small, to see the detail you can enlarge it by clicking on the image.)

X - Inlay with red porcelain slip
Transfered the letter lightly onto the clay tile using the transfer paper, then X marks the spot, dots with the pencil. Filled with red porcelain slip, left to dry a little....

...and once touch dry - fast tracking here (it is usually left to dry then sanded) I've used a turning tool to scrap back the slip to reveal the red porcelain slip clay inlay. I will sand when dry to sharpen up the final result.


Y - Freehand marking with red porcelain slip inlay
All my letters to date have been previously marked onto the clay via transfering paper, this time I've loosened up and drawn the letter Y and border freehand with a pencil deeply imprinting the clay tile. The dots are undertaken the same method as with X; clay slip inlay.

All cleaned up looking like a pink polka dot dress! Although once fired the slip will turn red.

Last but not least Z.... I decided to end my alphabet using the same technique that I started the alphabet with, (with the letter 'A') by method of Carving.

Z - Carving
YAY! All done, now all I have to do is -bisque fire them - glaze them - and fire them to 1300*
Stay posted to see the final result....

Kim Schoenberger - UVW

Two posts coming up for my last 5 letters for ALaW 2010, somewhat overdue! 5 weeks to be exact, but who's counting. :-/

UVW - Techniques...

U - Woodcut Print - with black underglaze
V - Negative Print - with red porcelain slip
W - Negative carving - with black underglaze (Reverse to V)

Method of making...

U - Woodcut Print with black underglaze
I've been at this one to conquer for sometime now, with each attempt amounting to dissapointment. And you could say that it was U that held up progress (plus xmas, new year etc...) to completing my ALaW in time. Not wanting it to get the better of me, I left it until I had optimine time to devote 100% head space to retry.


My adjustments I needed to re-address were (and many).

  • The initial carving needed to be deeper, so off to buy real (sharp) woodcut tools!
  • Always remember to carve your letter backwards, just as well the first attempt was a fizzer (and on a test tile).
  • Re-adjust the thinking to clay and not paper as in the workshop, of course Kim...this should have been your first thought, huh.
  • Using black underglaze (not ink) resulted in different tackiness, well no tackiness at all actually. Hence the printing ink roller was not suitable, out with the sponge roller, a test run, and wolla, yay, as easy as that!

The techniques for the next two letters are taken from this idea of the woodcut print process, minus or adding some steps to suit the clay.

V - Negative Print with red porcelain slip
Instead of carving into wood I've carved deeply and directly into the clay with a carving tool. Then with a sponge roller loaded with red porcleain slip, I've rolled over the clay tile to print a negative letter V. Being careful not to get any slip into the carved letter, as in the ink printing method.

W - Negative carving with black underglaze
Reverse to V - Instead of carving the letter first I carved it last. Using the sponge roller again, this time loaded with black underglaze I've rolled over the whole tile completely covering it with black. When touch dry I've transfered the letter W into the clay tile (gently) to make an imprint, then carved the letter and border.


Saturday, December 4, 2010

Kim Schoenberger - T

Being totally focused on preparations for my next exhibition and the extremely wet weather, I am now seriously lagging behind. We're already into December and I haven't finished the November letters... eeek, starting to feel a little under pressure. Especially now I am seeing everyone posting the last lot of letters up to Z!!!!

T - Carving

Seeing all the common techniques I am familiar with have been used, I'm starting to use the same techniques in previous letters in a different manner, thinking outside the norm if practically possible.

Here I'm carving the clay out around the letter to create a three dimensional 'T', much more challenging than the A and N, where A I carved directly around the outline and N carved within the outline resulting a negative letter.

Sanded and ready for bisque.

Wednesday, November 10, 2010

Kim Schoenberger - R S

R - Sgrafitto - with brushed on red slip

R is transfered onto the leatherhard clay tile in usual manner. Sgrafitto is generally a technique of scraping back into clay covered with slip, as seen with 'J' . I'm challenging logic with this one, letting go of rules and exploring, which some potters may ask "why?" I guess at this stage of the alphabet it's all about experiementing and I say why not! So instead of applying the slip I've just scraped into the clay body direct then brushed the red slip inside the R imprint and painted the border.

S - Imprint - with organic matter

A bit of fun, not sure what the end result will look like, fortunately I can rescue this if need be after the bisque firing. S transfered with a light pencil imprint as a guide, then wax emulsion applied to outline the letter and the border to act as a resist from the pressed in organic matter and to create a negative space with the letter, hopefully! In theory > the organic matter is pressed imprinting the clay and will burn away in the firing resulting inverted spots and the letter S will be revealed by the smooth surface.

Below is a close up for a clearer view - Quinoa grain is used and burnished in with my Tigers Eye polished stone for securing and reassuring a definite imprint.

Monday, November 1, 2010

Kim Schoenberger - NOPQ

NOPQ - Techniques...

N - Carving - negative
O - Resist - with shellac & red slip
P - Imprint - with a needle tool
Q - Underglaze - washed back

Saturday, October 30, 2010

Kim Schoenberger - NOPQ

I've just about got to the pointy end of the stick for the most common techniques, so now time to deviate and explore...

N - Carving negative
I used the carving technique with 'A' and created a positive, this time trying for a negative at the leatherhard stage I carved the clay inside the letter rather than on the outer.

O - Resist with shellac & red slip
With the letter 'I' shellac and sponged back into the clay with water created a raised 3 dimensional letter. Here with 'O' shellac is used to resist the red porcelain slip. Theorically what I am trying to achieve is, in the bisque firing the shellac will burn out resulting an O and border clean of slip.

P - dots
No guessing where this idea came from... getting to the pointy end of the techniques! Very simple really and I like the look.

Q - underglaze washed back
One would ask! Why apply black underglaze to wipe back with a wet sponge on a white bodied porcelain when wanting to create a pure white ground as the final result? I asked myself the same question half way through. Q - proven to be the most challenging one in this set of letters I won't know my verdict until the final firing...

Tuesday, October 12, 2010

Kim Schoenberger - JKLM

JKLM - Techniques...

J - Sgrafitto - with burnished red porcelain slip
K - Stamping - with foam and underglaze
L - Stamping - with foam and porcleain slip
M - Underglaze - brushed on

Kim Schoenberger - M

M - Underglaze - brushed on

Firstly, I transfered an imprint of the letter M onto the clay tile and using a very fine brush and a steady hand I've applied three coats of black underglaze. Three coats are necessary to achieve an even colour, if the application is not even a washed out look can result after the final firing.

Finished with a solid colour border, ofcourse.....as it was easier to do three coats solid rather than attempting a fine line! Sanded and ready for bisque.
Thought I'd share an extra image with you.... These are my clay tiles I'm using for each letter. I made (slab rolled) all 26 at once to keep them the same size, thickness etc...and have been stored in plastic since July, with an occassional mist spray to keep them leatherhard. They will eventually dry out and when they do I'll have to bisque fire them and apply my letter to bisqueware.

Monday, October 11, 2010

Kim Schoenberger - K L

I seem to be creating pairs of letters with two similar techniques.
K - Stamping - with foam and underglaze
Wanting to carve into foam I cut a square with a hacksaw blade. I first tried the dremel to shape a K, not to successful I might add! It just tore and grabbed at the foam. My second and successful attempt I used a hot soldering iron to melt away the foam.
After a few test runs and getting the correct consistency with the underglaze, I felt confident enough to stamp the K. The foam is pressed very lightly into the container of underglaze, a gentle hand is needed in both soaking up the colour to stamp and when stamping, so it doesn't go into the negative space and leave behind a blotchy letter.
Phew! All good, I had to hold my breath while doing this one!

L - Stamping - with foam and porcleain slip

Once again the letter is burnt out in the foam using a hot soldering iron (...carefully and not inhaling the toxic fumes!)* and is cut to make a square.

Reverse to the K tile, a thick and smooth porcelain slip is brushed onto the clay tile first. The foam sponge is gently pressed onto the tile to soak up the excess slip creating a nice texture surrounding and the letter is left smooth and slightly three dimensional. Extremely hard to see in this photo, a close look you can see the shiny bit being smooth.

Almost finished K & L, I intend to sharpen the lines on K with black underglaze in a fine nib bottle and outline the L (now bone dry is almost impossible to see in the photo).

P.S....CAN ANYONE PICK THE MISTAKE IN THIS POST?
*Hot soldering iron and foam is not really an ideal technique and I wouldn't use it again or recommend anyone to use it. As this is an exercise in experiementation was the only reason for attempting. I found it to be very challenging not to over melt the foam and toxic.

Tuesday, September 14, 2010

Kim Schoenberger - J

J - Sgrafitto
A coloured slip is applied to the clay and carved, scratched or incised with a tool to reveal a different colour underneath.
Really Rich Red slip is being applied to the tile.
Before transfering my letter J and carving into the slip I decided to burnished the tile. Burnishing gives a mirror finish to the surface, it can be traced back to ancient civilisations and was used in unglazed low temperature firings as means of partially sealing the pot, but I'm using it for pure aesthetics and experimentation to see how it responds in a high temp firing compared to that of lower temp firing.
Burnishing stones on the left and carving into the tile.
The slip always looks mottley at this stage but it will burn clean in the firing.
Burnished tile and carved...

Photographed on an angle to show the mirror finish resulting from burnishing and polishing off with a soft plastic freezer bag for extra gloss!

Saturday, September 4, 2010

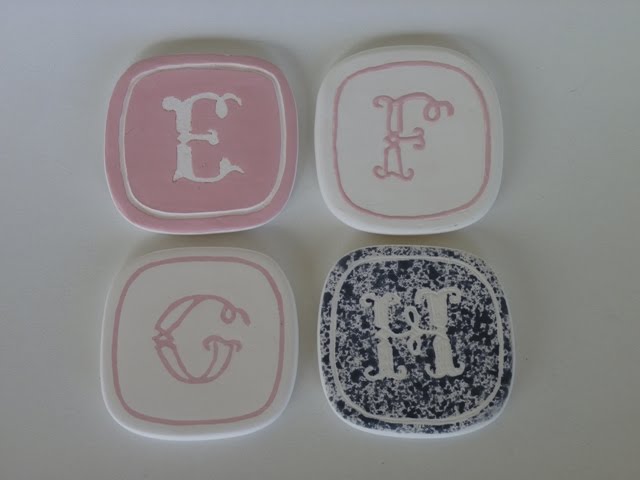
Kim Schoenberger - EFGH & I

EFGH & I - Techniques...
Porcelain tiles... bisque fired:
E - Resist with paper
F - Slip trail
G - Inlay
H - Resist with latex
...and

I - Resist with shellac

ps. all details on techniques found in labels under Kim Schoenberger

Saturday, August 28, 2010

Kim Schoenberger - H I

Once again two entries and two similar techniques.
H - Resist with Latex

After tracing letter & border into the clay I've put some liquid latex into a small nib bottle for easy application, well almost. After a few practice runs I finally got the hang of it thankfully latex is easily removed when a mistake happens!

I've added colour with black underglaze and used the spatter method with an old toothbrush, once dry the latex is peeled off.

Finished H - sanded, dry and ready for bisque.

I - Resist with Shellac

As per I've traced the letter into the clay and outlined the border.

With a fine brush shellac is applied to the letter and border. Once the shellac has dried a damp sponge is used to wipe back the clay.

In the bisque firing the shellac will burn out revealing the raised letter and border.

Friday, August 20, 2010

Kim Schoenberger - F G

Two entries, two techniques.... look similar but different! Short and sweet...
F - Slip Trail
As with all previous letters; traced outline onto clay first. The Really Rich Red porcelain slip is filled into a slip trailer with a fine nib point and is trailed over outline to make the letter F and border.

Ready for bisque - sanded and sharpened lines up with a blade knife.

G - Inlay
As the names suggests, coloured clay is inlaid into the wet claybody. The letter transfered as usual, using a carving tool cutting into the clay to make the letter G and border

There are several methods of filling, such as a butter knife, brush, fingers etc...I've chosen to use the slip trailer seeing it is loaded and will give me relatively a clean process for finishing.
It's left to harden to the leatherhard stage and the excess slip is scraped off with a flexible metal kidney, revealing the lines of colour.

Finished - dry stage, sanded and ready for bisque!

Kim Schoenberger - E

Abit behind the 8 ball...doing catch up!
It's a bit too cool and damp for the studio today and I feel like staying inside and dry... because I can!
Techniques continue....basic methods of application when working with clay.

E - Resist with paper

E traced, cut and positioned into place on clay,
Slip made with Really Rich Red stain and porcelain clay, to a paste and brushed on,

left to dry, then paper is carefully lifted off.

Completely dry, defined all line bleed from application of slip, sanded and ready for bisque.

Thursday, August 5, 2010

Kim Schoenberger - ABCD 2

ABCD - Techniques....
Porcelain tiles - still in the raw stage:
A - Incising
B - Applied Decoration
C - Impression
D - Sprigg Decoration

Kim Schoenberger - D

D - Sprigg Decoration
Making spriggs are relatively easy and are great for repetitive, low-relief motif decoration on a clay surface. I've created my 'D' sprigg by carving into plaster with my trusty dremel as I did for my 'C' although, this time I've carved a larger negative space.
After tracing my letter D onto the plaster, I've carved to make the D. I liked the texture the carving tool created, when the clay is pressed in to make the sprigg, it'll give great texture in the clay.


A test is made (as above on right of plaster) with a small piece of clay to see if the D looks ok, this also takes away any fine plaster dust left from the carving. Taking another sprigg; finding it's final position, scoring both sides of the tile and the back of the D sprigg ...

...the two are joined gently.

Lots of care and a steady hand are needed here, making sure no air has trapped underneath, a good join... so it doesn't pop off in the firing and clean and neaten the edges.

D - sanded and ready for bisque firing.