Showing posts with label Noela. Show all posts

Wednesday, November 24, 2010

NOELA'S WEEK 21

...the spine with woven embroidery thread binding and black paper tapes.


Friday, November 19, 2010

NOELA'S WEEK 20

Finished book with front cover

Wednesday, November 10, 2010

NOELA'S WEEK 19

I made a firm cover from matt board and covered it with nice black Nepalese hand made paper then glued the image on top.

Thursday, November 4, 2010

NOELA'S WEEK 18

The Cover:
I used a mish mash of all the previous techniques and materials to create an alphabet image for the book cover - blue dyed tissue paper, used teabags, pen, brush and black and white inks, PVA, old book text and paper.

Friday, October 29, 2010

NOELA'S WEEK 17

I have woven a linen thread through the threads on the spine of my book and added a couple of heavy paper tabs which will be glued down onto the covers.

Wednesday, October 20, 2010

Noela's week 16

I used the same font as the hand drawn alphabet [Gaze condensed], and printed the title page onto an old foxed and yellowed page from a found book. Then I glued it onto the first page in my alphabet book.

Thursday, October 14, 2010

Noela's week 15

The book is starting to take shape now. I have made 14 signatures consisting of the pages with the letters glued down on both sides plus a spacer piece [black paper covered with teabags also glued down]. Each signature is pamphlet stitched through five holes with the thread left free in the middle.

Wednesday, October 6, 2010

Noela's Week 14

The letters are finished and I have mounted them onto black pages that will form a simple pamphlet stitched book.

Tuesday, September 28, 2010

..and week 13

I must have been late with last week and early with this week.
The next background layer is text from a musty old academic literature text book.


Thursday, September 23, 2010

Noela's week 12

I glued the letters onto black backgrounds - thus setting off the letters a bit better and creating a cohesive set of images.
I am also scanning my letters now instead of photographing - I get a sharper image - don't know why I didn't think of this earlier!!

Tuesday, September 14, 2010

Noela - Week 11


I have finished 'fiddling' with my teabag/tissue letters. I am happy with them now - still messy and  'wabi sabi', but with an overall sense of order.
I added lower case letters with white ink and roughly oulined the capitals.

Sunday, September 5, 2010

Noela's weeks 9 and 10

I have broken with my methodical step by step approach this week - I am posting about the progression in my First Alphabet's final presentation. I made a half measurement, to scale, version of the green wooden box out of foam core and matt board. Then I photographed each outside and inside surface of the green wooden box. I adjusted the pics so that they were neat, scaled rectangles then printed them to size on a special plasticised copy 'paper' which is water proof and stands up to wear and tear. I fixed the images to the box with double sided tape and acetone based craft glue.
I plan to make some sort of concertina book which fits inside the box.

Wednesday, August 25, 2010

Noela's latest

Week 8
Yes, it's back to messy again this week.
I glued some scrunchy blue tissue over the letters then redrew them with black and added a bit of brown felt marker for good measure. Maybe I'll now quit while I am slightly ahead, 'tho I'd rather like to add lower case letters in fine white ink over the top. Maybe just one more step????

Wednesday, August 18, 2010

Noela's letters

Week 7
I am torn between being spontaneous and being neat. My spontaneous 'calligraphic' marks are heavy and ugly and my neat 'calligraphic' marks are contrived and stilted. This week, I have again gone over my letters and even filled in background mistakes with yellow ochre gouache, in an attempt to make them neat. Next week will be messy again.

Wednesday, August 11, 2010

Noela and teabags

Week 6
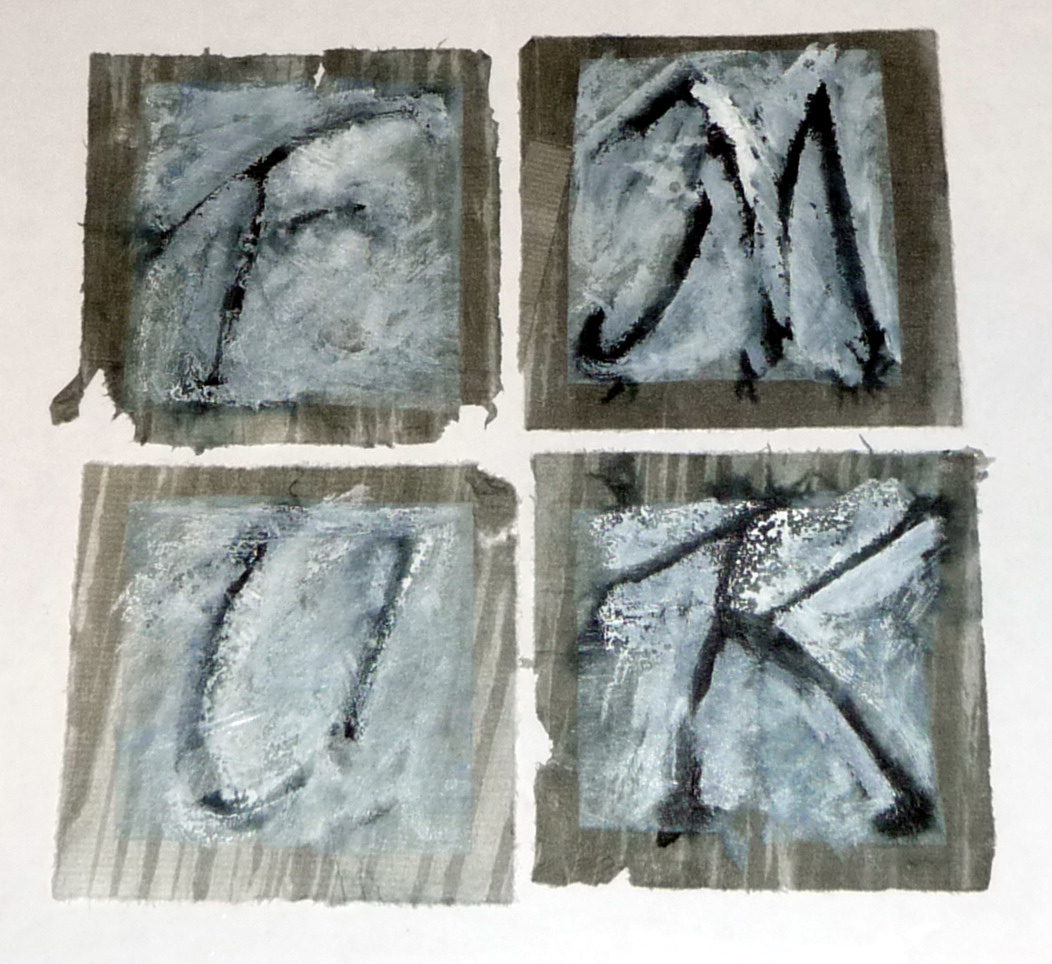
Yes, I have covered my letters with teabags.
If you are not sure how to use teabags in your artwork, here is what I do [sometimes!!].
I start by not squeezing out my teabags and then I let them dry in the sun.
Next I undo the staple and open out the teabag.
I throw out the dried tea [yes, in the compost would be good],
then I iron the teabag tissue flat.
I have cut the tissue to the appropriate size for my ALaW letters and glued it over the inked letters. There was very little smudging, so back to square 1!!!


Wednesday, August 4, 2010

NOELA'S WEEK 5

I feel like I'm going around in circles here. I have redone the letters on my tissue and gouache background, but they are now too contrived. I was pleasantly surprised that many of you liked the smudgy letters of 2 weeks ago, so maybe I'll glue wet teabags over the letters [which are sure to smudge again]. I'll give it a try and see what happens. Stay tuned!!

Wednesday, July 28, 2010

Noela's letters

Week 4
Backgrounds 'blocked in' with white gouache.
Last week, my letters were running everywhere- some happily, others chaotically, so some discipline was needed. Unfortunately the lovely ones are no longer, but I still have 22 weeks to play with the letters -anything could happen!

Thursday, July 22, 2010

Noela's latest

WEEK 3
...hmmmm, more smudging as I glued the tissue paper over the background. Once dry, I ironed the letters which made them nice and flat but they are still smudgy.
Time to get out the white ink - see what I can do with that.

Tuesday, July 20, 2010

NOELA'S WEEK 2

Last week was week 2, and I painted some tissue paper with mottly blues.
The idea is to cut tissue squares a little smaller than the 7cm backgrounds and to paste them over the ink drawn letters to soften the effect.
 
One of the problems I faced was that the tissue stuck to the plastic background when dry, so some of the tissue had to be scraped off ending up rather like crepe paper. 
Fortunately there was enough 'good' painted tissue left to use for my overlays.

Sunday, July 18, 2010

NOELA'S SECOND ALPHABET

Yeah!! I have started my second alphabet.
I am trying an entirely different approach with this one.
I have decided to do 26 stages of the whole alphabet rather than 26 letters individually. That way I can let the letters 'evolve' and I can share the challenges and solutions along the way.
WEEK 1
I used a PILOT Parallel Pen on soft Japanese pre painted paper.
I had problems with the ink bleeding but wanted to persevere because I like the background paper.