As the work progressed it seemed to assume an Asian influence and not just because of the kimono fabric I had used, but also because of the nature of the triangular-shaped letters. I added the bamboo rod at the top to enhance this feeling. I really enjoyed working with the beautifully patterned fabrics.
Showing posts with label Elaine. Show all posts
Thursday, January 13, 2011
Elaine's second alphabet final piece
Right from the beginning I had decided on a wall hanging as the finished piece. As you would have noticed from the monthly photos, the squares were attached to a backing fabric which was the base for the hanging. I couldn’t be sure, until the end, that the colours and decoration would work together as a whole, but I am really pleased with the way it turned out
Monday, January 3, 2011
Elaine's last letter...
I had finished the Z and its coloured squares just before my family arrived a week ago from Switzerland for a 2 week stay. Needless to say I haven’t had much time, but here they are now and I hope to finish off the 2nd alphabet, as a wall hanging, soon.
The Z row came together very quickly, the small shells just seemed the right decorations for one square and highlighting the flowers with simple embroidery on the other seemed to be all that was necessary.
A very big thank you Fiona for all that you have done, especially posting my work every month. I appreciate it very much! I am looking forward to continuing, many ideas are racing around in my head!
The Z row came together very quickly, the small shells just seemed the right decorations for one square and highlighting the flowers with simple embroidery on the other seemed to be all that was necessary.
A very big thank you Fiona for all that you have done, especially posting my work every month. I appreciate it very much! I am looking forward to continuing, many ideas are racing around in my head!
Wednesday, December 8, 2010
Elaine's kimono letters continue
I think I was a few letters behind and now I am a few letters ahead!
Searching through my bag of ‘bits and pieces’, to find embellishments, has been fun too. This time I have added a silk flower, a beads and some fine cord.
Tuesday, November 2, 2010
Elaine's letters P to T
I am a few letters ahead again as I find it easier to work across two rows at a time. I really enjoy searching through the beautiful colours of the Japanese silks to find the one that is ‘just right’ in colour, in relation to the surrounding letters, and suitable for the letter’s shape.
Tuesday, October 5, 2010
Elaine's first alphabet - finished
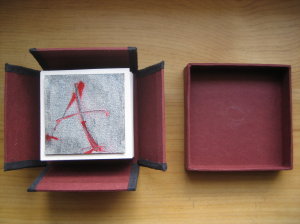
It was exciting to see the whole alphabet come together as I hadn’t originally made the letters in alphabetical order. I knew how I wanted to present the alphabet, but it took me a while to work out how to make the four concertina ‘arms’ fold neatly over each other. The lid of the box holds it closed since I cut the sides of the box to allow it to open out. The concertina letters are attached to the inside base. I chose to use this box as it was made by underprivileged women in Bangladesh.
Monday, October 4, 2010
Elaine's next letters...
Here are my next triangular letters (with the usual addition of an un-cut square) cut again from Japanese Kimono silk off-cuts.
It is a great feeling to be up-to-date. I am even slightly ahead, but I find it easier to work out the colour combinations if I work right across the row.
Tuesday, September 14, 2010
Elaine's 2nd alphabet
We got back from overseas at the end of July and yet it is only now that I have been able to work on my second alphabet. It has been very frustrating as I wanted to get started.
My plan this time is to make a wall hanging using my collection of off-cuts from Kimono silks. The alphabet is one that I designed many years ago at a wonderful workshop that I attended in Germany with American calligrapher, Alan Blackman. The exercise was to design an alphabet based on a geometric shape, I chose the triangle. The letters aren’t always easily recognisable, but I don’t mind that.
For the letters I am using the silks which I have appliquéd onto the calico. I placed them into 7 cm squares which I stitched on the sewing machine with black thread onto the calico background. In each alternate row I have placed an un-cut square so as to break up the overall design.
These, as well as some of the letters are embellished in various ways with things like beads, embroidery, buttons, sequins. I might need to add extra bits and pieces of decoration, but I won’t know that until I have finished them all.
Wednesday, June 30, 2010
Elaine's final letters...&
Elaine sent these thru a week or so ago so I apologise for the late posting (Fiona).
I am off overseas tomorrow, until the end of July, so I am sending my June letters in a early. The July letters will be a little late.
This has been a wonderful experience, I have enjoyed the challenge so much. When I first planned the alphabets I thought I would do a similar exercise for the 2nd alphabet using lower-case letters. Now I have other ideas, more colour that’s for sure.
Week 22. L
Monoprint, printed from a paper stencil of the letter ‘L’, using red and silver printing inks. I tried to create a dark and slightly mysterious atmosphere with the combination of the printing inks on the textured side of the Canson Mi-teintes paper.
Week 23. T
The background is a black and white photograph using a ‘tone dropout’ technique. I couldn’t resist adding the letter T to the ghostly image of the tree. Written with silver acrylic gouache in a double ruling pen, the red gouache highlight added later.
Week 24. M
I covered the background paper with red and silver oil pastel crayons, then painted black gouache over the top. While the gouache was still slightly wet I ‘drew’ into it with the end of a paint brush handle allowing the colours to reappear.
Week 25. U
With two metal knitting needles tied together I wrote the letter on the textured side of Canson Mi-teintes paper. The needles made slight indentations into the paper which showed up when shaded lightly with the red and silver coloured pencils. (The silver pencil outline is actually parallel to edge of the square, my photo is not shot square on).
Week 26. F
Multi printing of my hand-cut rubber stamp using a silver stamp pad. Red gouache in the ruling pen for the line (this line is parallel to edge of the square, my photo again not shot square on).
And &
I needed an extra letter whch will fill a space in the finished layout of the alphabet.
I used a reed pen and Dr. Martins silver Spectralite ink to write the &. I added some red foil as a decoration
I am off overseas tomorrow, until the end of July, so I am sending my June letters in a early. The July letters will be a little late.
This has been a wonderful experience, I have enjoyed the challenge so much. When I first planned the alphabets I thought I would do a similar exercise for the 2nd alphabet using lower-case letters. Now I have other ideas, more colour that’s for sure.
Week 22. L
Monoprint, printed from a paper stencil of the letter ‘L’, using red and silver printing inks. I tried to create a dark and slightly mysterious atmosphere with the combination of the printing inks on the textured side of the Canson Mi-teintes paper.
Week 23. T
The background is a black and white photograph using a ‘tone dropout’ technique. I couldn’t resist adding the letter T to the ghostly image of the tree. Written with silver acrylic gouache in a double ruling pen, the red gouache highlight added later.
Week 24. M
I covered the background paper with red and silver oil pastel crayons, then painted black gouache over the top. While the gouache was still slightly wet I ‘drew’ into it with the end of a paint brush handle allowing the colours to reappear.
Week 25. U
With two metal knitting needles tied together I wrote the letter on the textured side of Canson Mi-teintes paper. The needles made slight indentations into the paper which showed up when shaded lightly with the red and silver coloured pencils. (The silver pencil outline is actually parallel to edge of the square, my photo is not shot square on).
Week 26. F
Multi printing of my hand-cut rubber stamp using a silver stamp pad. Red gouache in the ruling pen for the line (this line is parallel to edge of the square, my photo again not shot square on).
And &
I needed an extra letter whch will fill a space in the finished layout of the alphabet.
I used a reed pen and Dr. Martins silver Spectralite ink to write the &. I added some red foil as a decoration
Monday, June 7, 2010
Elaines May letters
I wanted to create a 3D illusion and at the same make it appear that the letter was done with silver threads. I used silver gouache and pressure on a copperplate nib to write ‘over’ the letter shape and light strokes for the background. The red threads are real!
Week 19. Y- EW
The background is a black and white photo printed on photocopy paper. The Y is cut out from a thin overhead transparency film. I like the way the two pieces seem to become one.
Week 20. J - EW
Lino print using silver and red inks. I must admit that the J was part of a larger lino print that I had done sometime ago. To fit it into the 7 cm square I had to use a detail, but it seems to work like that too.
Week 21. K - EW
Silver artificial leaf on Wills gilding mix The red crayon and white pencil were added afterwards as I felt the letter didn’t have much character and these also helped to show up the texture of the paper.
Thursday, May 6, 2010
Elaine's April Letters
I am amazed that there are so many different techniques that can be used to create letters. I thought I would have run out by now. It is great fun, but as far as colour goes I am looking forward to using lots more of that in the 2nd alphabet!
Week 14. R - EW
Cola pen filled with red gouache and silver acrylic gouache.
Week 15. W - EW
I wrapped string around a piece of wood to make a W-shaped stamp then printed it using acrylic gouache. Second W stitched with red thread using a sewing machine.
Week 16. Q - EW
I used a compass and gilding mix and then laid down artificial silver leaf. The red gouache marks were also made with the compass.
Week 17. C - EW
Using the silver acrylic ink bottle dropper I wrote onto a black and white photo. Red paper highlight.
Week 14. R - EW
Cola pen filled with red gouache and silver acrylic gouache.
Week 15. W - EW
I wrapped string around a piece of wood to make a W-shaped stamp then printed it using acrylic gouache. Second W stitched with red thread using a sewing machine.
Week 16. Q - EW
I used a compass and gilding mix and then laid down artificial silver leaf. The red gouache marks were also made with the compass.
Week 17. C - EW
Using the silver acrylic ink bottle dropper I wrote onto a black and white photo. Red paper highlight.
Wednesday, April 7, 2010
Elaine's latest letters
I am still excited by the process I set myself of working through my collection of ‘interesting ideas’. Keeping to my restricted palette of silver and red on black paper certainly stretches the mind.
Week 9. D - EW

Week 13. N- EW
Letter cut out from ‘Brayer’ Paper (tissue papers coated with gesso and acrylic paints using a brayer). Black machine stitching.
Week 9. D - EW
Hand-cut rubber stamp, printed with a silver stamp pad. Red gouache in a double ruling pen.
Week 10. G - EW
Red ink and silver gouache in a double ruling pen.
Week 11. S- EW
Japanese chopstick using red ink and silver gouache. 
Week 12. X- EW
Jo Sonja iridescent red acrylic paint, written directly from the tube.
Week 13. N- EW
Letter cut out from ‘Brayer’ Paper (tissue papers coated with gesso and acrylic paints using a brayer). Black machine stitching.
Monday, March 1, 2010
Elaine's February 4

Week 5. E - EW
Machine stitching, with and without thread, and hand stitching on black textured card.
Week 6. H - EW
Silver paper and red tissue paper on black textured card.
Week 7. P - EW
Week 7. P - EW
Silver foil and red tissue paper pasted onto black card. While still wet a palette knife was used to ‘write’ the letter through the layers.
Week 8. I - EW
Sequins, beads and thread on black card.
Thursday, January 28, 2010
The first 4 - Elaine
For this project I decided that I would work through my collection of interesting ideas that I was always going to do something with ‘one day’.
I sometimes use gold in my work, but very rarely silver, so I decided to restrict my palette to silver, black and red and work on black paper. The only exception to my rule is that I can also incorporate black & white photos. Elaine.
Week 1. A - EW
Silver gouache painted onto black Velin Arches 250 gsm paper, letter written with ruling pen using black and red ink.
Week 2. B - EW
Black and white photograph painted with gesso, plastic tool to ‘write’ letter into the wet surface. Red thread highlight.
Week 3. Z - EW
Scratch foam print using a 3B pencil as the mark-making tool. Printed with silver block printing ink on black Canson Mi-Teintes paper
Week 4. O - EW
Wet-on-wet wash. Black, red and silver inks applied with dropper on black Velin Arches 250 gsm paper. Letter O written with silver 3.5mm Zig marker.
I sometimes use gold in my work, but very rarely silver, so I decided to restrict my palette to silver, black and red and work on black paper. The only exception to my rule is that I can also incorporate black & white photos. Elaine.
Week 1. A - EW
Silver gouache painted onto black Velin Arches 250 gsm paper, letter written with ruling pen using black and red ink.
Week 2. B - EW
Black and white photograph painted with gesso, plastic tool to ‘write’ letter into the wet surface. Red thread highlight.
Week 3. Z - EW
Scratch foam print using a 3B pencil as the mark-making tool. Printed with silver block printing ink on black Canson Mi-Teintes paper
Week 4. O - EW
Wet-on-wet wash. Black, red and silver inks applied with dropper on black Velin Arches 250 gsm paper. Letter O written with silver 3.5mm Zig marker.
Subscribe to:
Posts (Atom)