Saturday, August 28, 2010

Kim Schoenberger - H I

Once again two entries and two similar techniques.
H - Resist with Latex

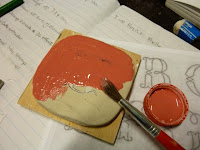
After tracing letter & border into the clay I've put some liquid latex into a small nib bottle for easy application, well almost. After a few practice runs I finally got the hang of it thankfully latex is easily removed when a mistake happens!

I've added colour with black underglaze and used the spatter method with an old toothbrush, once dry the latex is peeled off.

Finished H - sanded, dry and ready for bisque.

I - Resist with Shellac

As per I've traced the letter into the clay and outlined the border.

With a fine brush shellac is applied to the letter and border. Once the shellac has dried a damp sponge is used to wipe back the clay.

In the bisque firing the shellac will burn out revealing the raised letter and border.

August Letters - Gemma


I had a feeling these letters were going to evolve as I progressed through time. So not only do I complete the letters for the month but the previous ones get a new look as well. I have already planned the next four ... so all of these will change. Step by step, inch by inch, I am enjoying this challenge. I am imagining once I complete all twenty-six (or 27) there will be a metamorphosis.
Here you can see the letters are in their required 7cm x 7cm squares but on individual folios to be bound in multi-sections upon completion. The different media used for the letters are gouache, walnut ink, raised and burinished 23.75ct gold leaf using Brause nibs, brush, wood-block & horizon pen. Executed on Arches 300gsm hotpress watercolour paper. Questions welcome.

Enjoy! x gb

Wednesday, August 25, 2010

Noela's latest

Week 8
Yes, it's back to messy again this week.
I glued some scrunchy blue tissue over the letters then redrew them with black and added a bit of brown felt marker for good measure. Maybe I'll now quit while I am slightly ahead, 'tho I'd rather like to add lower case letters in fine white ink over the top. Maybe just one more step????

August blog of 2nd Alphabet

August blog of 2nd Alphabet

Again I am continuing using Gouache as a wash and then for my flower theme on 300 gsm after which I have embossed my letter.
Please continue to enjoy. Ann S.

Tuesday, August 24, 2010

Fiona's First alphabet - finished!

I finally got around to finishing my final piece for the first alphabet.

Because I was doing an experimental alphabet - trying out new ideas, techniques and materials, there wasn't a really cohesive feel to the final alphabet (even tho each letter was a Roman Capital that wasn't quite unifying enough!).

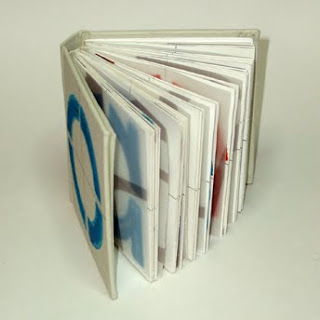
I decided that to be true to their nature I wanted to do a sampler book - like embroidery samplers of old.  Barry and I thrashed around options and came up with this design.

I punched holes in the mat board pages and mat board spacers, wrote what I did with each letter on the boards, attached the finished letters, then attached them so they can turn.

Sunday, August 22, 2010

Mieke van Sambeeck.

Finished the first 8 at last.
JULY..

Apple-Banana-Cherry-Date.
-------
AUGUST.
Egg fruit-Fig-Grapes-Hot chillies.
-----

Saturday, August 21, 2010

Ta da! The finished work from Meg

The end!


Meg (confuzed)

Friday, August 20, 2010

Kim Schoenberger - F G

Two entries, two techniques.... look similar but different! Short and sweet...
F - Slip Trail
As with all previous letters; traced outline onto clay first. The Really Rich Red porcelain slip is filled into a slip trailer with a fine nib point and is trailed over outline to make the letter F and border.

Ready for bisque - sanded and sharpened lines up with a blade knife.

G - Inlay
As the names suggests, coloured clay is inlaid into the wet claybody. The letter transfered as usual, using a carving tool cutting into the clay to make the letter G and border

There are several methods of filling, such as a butter knife, brush, fingers etc...I've chosen to use the slip trailer seeing it is loaded and will give me relatively a clean process for finishing.
It's left to harden to the leatherhard stage and the excess slip is scraped off with a flexible metal kidney, revealing the lines of colour.

Finished - dry stage, sanded and ready for bisque!

Kim Schoenberger - E

Abit behind the 8 ball...doing catch up!
It's a bit too cool and damp for the studio today and I feel like staying inside and dry... because I can!
Techniques continue....basic methods of application when working with clay.

E - Resist with paper

E traced, cut and positioned into place on clay,
Slip made with Really Rich Red stain and porcelain clay, to a paste and brushed on,

left to dry, then paper is carefully lifted off.

Completely dry, defined all line bleed from application of slip, sanded and ready for bisque.

Thursday, August 19, 2010

Sue's next alphabet

At long last I have done some letters for JULY!! August will hopefully follow next week. I used Sharpie Poster Silver and Gold Paints, Tombow ABT Pen, Zig Writer Metallic Pens, Zig Millennium Pens mark making and Pilot Parallel Pen, 6.0mm for letters. Forgive me for taking sooo long to send this to you. 

Warm regards, Sue Williams

Wednesday, August 18, 2010

Noela's letters

Week 7
I am torn between being spontaneous and being neat. My spontaneous 'calligraphic' marks are heavy and ugly and my neat 'calligraphic' marks are contrived and stilted. This week, I have again gone over my letters and even filled in background mistakes with yellow ochre gouache, in an attempt to make them neat. Next week will be messy again.

Saturday, August 14, 2010

Meg's final bits for these two alphabets

Well, now the 'q' is fixed, so here it is with the last letters to complete my two alphabets. I have everything out ready to start the next one. Stay posted ...


Confuzed as always,
Meg


Wednesday, August 11, 2010

Noela and teabags

Week 6
Yes, I have covered my letters with teabags.
If you are not sure how to use teabags in your artwork, here is what I do [sometimes!!].
I start by not squeezing out my teabags and then I let them dry in the sun.
Next I undo the staple and open out the teabag.
I throw out the dried tea [yes, in the compost would be good],
then I iron the teabag tissue flat.
I have cut the tissue to the appropriate size for my ALaW letters and glued it over the inked letters. There was very little smudging, so back to square 1!!!


Tuesday, August 10, 2010

Gemma - part two

"C"

After some techinical difficulties with my camera which is now over one year old (and out of warranty of course) I have been keen to get these to the site. I am working two projects with the same blocks I found at a little antique shop at Newtown.

My plan is to continually work on both the codex and the broadsheet as I try to pull them together as a whole. It will be interesting to watch them evolve over the coming five months. Successfully I hope!

Pretty simple looking right now ... I have kept a simple form to date on purpose. The ink I have used is a faded walnut ink with a ghostly feel to them as the blocks as so old. The codex is on Arches 300gsm hotpress and the broadsheet is on Arches text wove.

Broadsheet

Codex
If you can guess the secret about the "A" I would be interested to hear your thoughts.

Sunday, August 8, 2010

Meg's next lot ...

I am getting there slowly. I have an idea for my next alphabet, but am not allowed to start till this one is finished. I have a problem with Q and have to fix it, so here is O, P, R, S, T, and U.